-1.png?width=325&height=55&name=Betco_logo%20rev%20(002)-1.png)
Machine Preparation
- Add appropriate amount of cleaning chemical for 25 gallon tank to solution tank (see chemical labeling for dilution ratio)
- Add solution to tank via front fill port
- Fill solution tank via front or rear fill port
- Refer to solution sight gauge located at rear left side of unit to determine water level
- Install squeegee assembly on rear of machine via squeegee knobs
- Align squeegee knobs with bracket on rear of machine
- Place squeegee assembly on bracket, hand tighten knobs until unable to turn
- Attach water recovery hose to squeegee assembly via red port

- Install pads, pad drivers, or alternatively install scrub brush to scrub deck
-
Disc scrub deck with pad driver
- Remove pad retaining clip
- Center pad on pad driver
- Press pad retaining clip back into position
- Align pad drivers with drive hub under scrub deck
- Use pad driver auto-on feature
- Turn machine on
- Select lowest speed
- Select medium down pressure (setting #2)
- Engage bail switch to lock pad drivers into position
-
-
-
Orbital Scrub Deck
-
-
-
- Align rectangular pad to pad driver on scrub deck
- Ensure front of pad is 1/2 inch forward of drive plate
- Press corners of pad into scrub deck followed by pressing in sides and center to ensure proper attachment
- Align rectangular pad to pad driver on scrub deck
-
Machine Operation
- Turn machine on via key
- Select appropriate settings for required cleaning need
-
Daily cleaning
- Select low solution flow
- Select low down pressure (setting #1)
- Select moderate to high speed
-
-
-
Project work / heavily soiled floor
- Select medium solution flow
- Select medium down pressure (setting #2)
- Select low to moderate speed
-
Floor finish removal (Orbital version only with maroon scrub pad)
- Select low solution flow
- Select medium or high down pressure (setting #2 or #3)
- Select very low speed
-
- Lower squeegee assembly via lever
- Squeeze bail switch to propel unit forward
- Release bail switch to stop machine and scrub deck
- Lift squeegee and press bail switch away from handle to propel unit backwards
- Raise squeegee when cleaning is complete
- Recovery vacuum will stay engaged for several seconds to evacuate hose
Daily Maintenance
- Empty recovery tank
- Align rear of machine with approved drain
- Remove cap of recovery tank hose above tank water level
- Kink recovery hose and lower to to drain, release to drain water
- Clean debris tray located in recovery tank
- Dump contents into trash
- Check status of Fortify defoamer puck
- Replace puck if fully dissolved
- Defoamer is critical to ensure foam does not damage vacuum motor
- Replace puck if fully dissolved
- Rinse out recovery tank
- Ensure vacuum ball filter is removed and rinsed
- Reinstall recovery tank hose cap and return to clip
- Clean pads or brushes
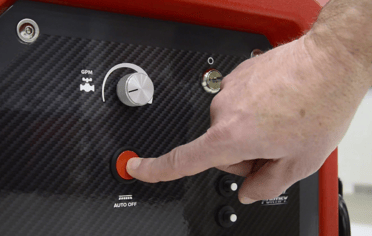
- Select up (transport) position for scrub deck
- Use Auto Off feature to remove pad drivers
- Remove pad retaining clip
- Rinse pads in approved sink and air dry
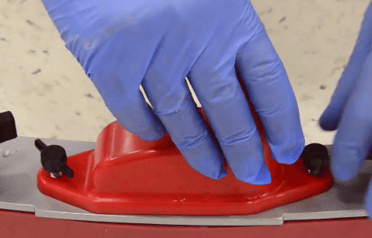
- Clean squeegee assembly
- Remove squeegee assembly by loosening black knobs
- Detach recovery hose
- Rinse assembly in approved sink and dry
- Inspect and rinse drip trap to remove debris
- Hang squeegee assembly from transport hook to dry

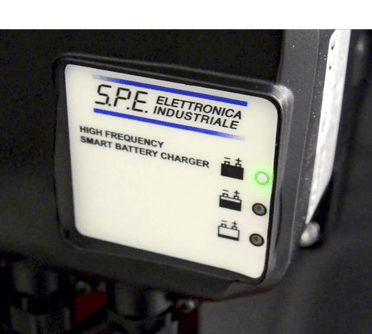
- Charge batteries
- Unwrap electrical cord and plug in to electrical outlet
- Green status light on charger indicates batteries are fully charged
Operation video guide